
![]()
Create a new account that will be a main profile of your business and confirm your email.
Time to complete: 1 min
If you are a team member of an existing business, accept an invitation that you will receive via email after the main account owner invites you and jump to the Two-Factor Authentication (2FA) setup—you don’t need an additional verification.
![]()
Add profile information and branding.
Time to complete: 3 min
Fill in the General Settings section to complete your profile. Pro users can also add a custom logo that will be used in all communications, a custom URL for trip pages, and an insurance link.

![]()
Verify your account.
Time to complete: 15 min
You can start exploring the platform before the verification but you will not be able accept payments and your booking pages will not be visible publicly.
![]()
Add team members and assign permission levels.
Time to complete: 3 min
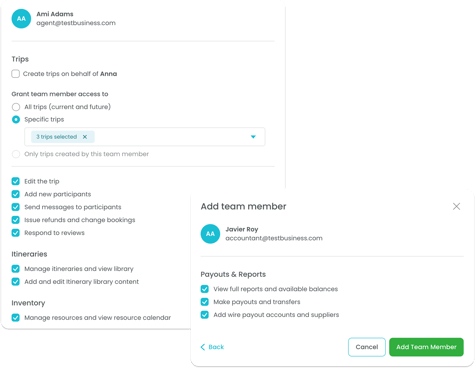
Grant access to manage your trips, itineraries or payments.
![]()
Create a Trip Page.
Time to complete: 15-40 min
![]()
Share the page using a widget or direct link.
Time to complete: 2-10 min
Note that you need to be verified to accept bookings and payments. Go to Step 1 for instructions.
![]()
Add a payout account.
Time to complete: 10 min
Note: If your initial verification decision was “partial approval,” contact info@wetravel.com 30 days after the trip’s conclusion to request a review of your account for a possible upgrade in status. Alternatively, you can connect your own Stripe account. See more details here.
![]()
Convert funds to another currency for free.
Time to complete: 1 min
Instantly convert funds in your WeTravel wallet. Go to the Payments tab and click Convert in the top right corner.
![]()
Add a supplier to send funds directly for free.
Time to complete: 5 min
No need to wait or pay extra fees. You can send funds to other WeTravel users in just a few clicks. It's easy, fast, and secure.
See how to invite your suppliers to join WeTravel →
Send this guide to your supplier to help them join WeTravel.
![]()
Apply for a WeTravel Card (available for the US-registered businesses).
Time to complete: 15 min
Create virtual Cards to send funds to your suppliers or add it to an Apple Wallet. WeTravel Visa® Commercial Credit Cards are powered by Stripe and issued by Celtic Bank, available for US-registered businesses. Learn more here.

![]()
Build your itinerary or start with pre-built samples.
Time to complete: 15-40 min
![]()
Add a Book now button to catch bookings right from the proposal.
Time to complete: 1 min
Create a Trip Page first (see Step 3), and then in the itinerary header, connect the Trip Page to the Book now button. You can also add additional Book now buttons as items.

![]()
Build your content library to create future itineraries faster.
Save sections and items to your library to reuse them in new itineraries.

![]()
Request a free migration for itineraries you built with other platforms.
Time to complete: 3 min
If you use other professional itinerary builders, we will help you to move to WeTravel for zero cost. Note that it has to be a day-by-day itinerary. Contact our team to learn more.
![]()
Upgrade to Pro Plan.
Time to complete: 3 min
With WeTravel Pro, everything is connected — from traveler info and payments to itinerary and signature collection. That means no dropped leads, no missed documents, no manual follow-ups. Just a better experience for your travelers and more time for you.
Follow this instruction to change type (monthly or annual) of active subscription →
![]()
Add custom branding.
Time to complete: 3 min
Build trust, reduce confusion, and create a seamless brand experience for your travelers with custom URL and logo.

![]()
Create inventory to never get overbooked.
Time to complete: 30-60 min
Set up your inventory to control availability of resources across all your trips.
![]()
Install account-level widgets.
Time to complete: 10-15 min
Avoid missed opportunities with lead capture widgets. In addition to trip-specific widgets, you can embed all your active trips in one frame, along with reviews and a “Contact us” form.

![]()
Set up integrations via Zapier or Partner API.
Let your tools work for you. Connect WeTravel and other systems that you use, like accounting software, tour ERP or custom database.
- Partner API (requires developers)
- Zapier (no-code workflows)
- Google Analytics
![]()
Subscribe to the monthly newsletter
All new features in your inbox monthly.
See all previous product launches in Updates Log.
![]()
See highlights of what changed right on the platform
Go to wetravel.com and scroll to the very bottom of the page where you can find the “Your Privacy Choices” button. Click on it and make sure that you enabled “Functional cookies”.
![]()
Need help?
Visit our Help Center contact our support team by opening the chat in the bottom right corner or by emailing info@wetravel.com.

Free tools to support all travel professionals selling group tours
The WeTravel Academy vertical built for you